Image upload to S3 bucket
Hey tech enthusiasts! Looking to add an image upload feature to your project without getting lost in complex design patterns? You're in the right place. In this blog post, I'll walk you through a straightforward demonstration on implementing an image upload. Just a simple and effective guide to get your images into an S3 bucket. Let's keep it practical and dive right in!
Let's setup the project
To begin with, let's create a folder with the command:
user@linuxcomputer ~ $ mkdir upload-image-s3
user@linuxcomputer ~ $ cd upload-image-s3
The first thing to do is to create a package.json, so we need to run the following command:
user@linuxcomputer ~/upload-image-s3 $ npm init -y
this will create the file package.json that manage all the project dependencies and some project information.
Installing dependencies
Usually, I don't install all dependencies at once, but for structure reasons I'm gonna do that. I typically install what I need as I need. For the dev dependencies run the command:
user@linuxcomputer ~/upload-image-s3 $ npm i typescript prisma tsx @types/express @types/node @types/multer @types/uuid -D
for the normal dependencies run:
user@linuxcomputer ~/upload-image-s3 $ npm i express multer @aws-sdk/client-s3 @aws-sdk/s3-request-presigner @prisma/client uuid dotenv
To be able to run and change the code and see the changes in a better way I gonna use tsx. You just need to add the following script to your package.json.
"script": {
  "dev": "tsx watch --ignore node_modules ./src/server"
}
the watch parameter let tsx keep checking for changes and restart the application and the flag --ignore does what you think (ignore the node_modules folder).
Now, run the following command to start the application
user@linuxcomputer ~/upload-image-s3 $ npx tsc --init
user@linuxcomputer ~/upload-image-s3 $ npm run dev
But you'll get a error because didn't create the file ./src/server.ts as you may notice. And that's our next step.
Create a folder named "src" in the root directory and inside the folder create a file named "server.ts" (or something else). In this article I'm not gonna follow any design pattern.
As I did with the dependencies, I'm gonna dump all the code in one file to focus only on the image upload, but as I do on a project you should structure your project in a way that make it more extensible and readable.
import dotenv from "dotenv";
import express, { Request, Response } from "express";
import multer from "multer";
import path from "node:path";
import fs from "node:fs/promises";
import {
  DeleteObjectCommand,
  DeleteObjectCommandInput,
  GetObjectCommand,
  GetObjectCommandInput,
  PutObjectCommand,
  PutObjectCommandInput,
  S3Client,
} from "@aws-sdk/client-s3";
import { getSignedUrl } from "@aws-sdk/s3-request-presigner";
import { PrismaClient } from "@prisma/client";
import { v4 as uuid } from "uuid";

import { multerConfig } from "./multerConfig";

dotenv.config();

const bucketRegion = process.env.BUCKET_REGION;
const bucketName = process.env.BUCKET_NAME;
const accessKey = process.env.ACCESS_KEY;
const secretAccessKey = process.env.SECRET_ACCESS_KEY;

const app = express();

const prisma = new PrismaClient();

const s3 = new S3Client({
  credentials: {
    accessKeyId: accessKey!,
    secretAccessKey: secretAccessKey!,
  },
  region: bucketRegion,
});

app.use(express.json());
app.use("/", express.static("./tmp/"));

const avatarUpload = multer(multerConfig);

app.post("/user", async (req: Request, res: Response) => {
  const { name } = req.body;

  const id = uuid();
  const newUser = await prisma.user.create({
    data: {
      id,
      name,
    },
  });

  return res.status(201).json(newUser);
});

app.get("/user", async (req: Request, res: Response) => {
  const users = await prisma.user.findMany();
  res.json(users);
});

/*
 * GET request needs a database to access the imageName
 * saved in the POST request.
 */
app.get("/user/avatar", async (req: Request, res: Response) => {
  const { user_id } = req.body;

  const user = await prisma.user.findUnique({
    where: {
      id: user_id,
    },
  });

  const params: GetObjectCommandInput = {
    Bucket: bucketName,
    Key: user?.avatar!,
  };
  const command = new GetObjectCommand(params);
  const url = await getSignedUrl(s3, command, { expiresIn: 3600 * 24 });

  return res.json({ url });
});

/*
 * Needs to save the imageName with a userId in the database
 */
app.post(
  "/user/avatar/upload",
  avatarUpload.single("avatar"),
  async (req: Request, res: Response) => {
    const { user_id } = req.headers;
    const file = req.file;

    const user = await prisma.user.findUnique({
      where: {
        id: user_id as string,
      },
    });

    if (!user) {
      throw Error("User not found!");
    }

    if (!user.avatar) {
      const dirName = path.resolve(multerConfig.tmpFolder, file?.filename!);
      const fileContent = await fs.readFile(dirName);
      console.log(fileContent);

      const putParams: PutObjectCommandInput = {
        Bucket: bucketName,
        Key: file?.filename,
        Body: fileContent,
        ContentType: file?.mimetype,
      };
      const putCommand = new PutObjectCommand(putParams);
      s3.send(putCommand);

      const getParams: GetObjectCommandInput = {
        Bucket: bucketName,
        Key: file?.filename,
      };
      const getCommand = new GetObjectCommand(getParams);

      const url = await getSignedUrl(s3, getCommand, { expiresIn: 3600 * 24 });

      await prisma.user.update({
        where: {
          id: user.id,
        },
        data: {
          avatar: file?.filename!,
        },
      });

      await fs.unlink(dirName);

      return res.json({
        url,
      });
    }
    return res.status(400).json({ message: "user already has an avatar" });
  }
);

/*
 * DELETE request needs the userId to identify the imageName
 * to delete from S3
 * Uses the DeleteObjectCommand from "@aws-sdk/client-s3"
 */
app.delete("/user/avatar/delete", async (req: Request, res: Response) => {
  const { user_id } = req.body;

  const user = await prisma.user.findUnique({
    where: {
      id: user_id,
    },
  });

  const params: DeleteObjectCommandInput = {
    Bucket: bucketName,
    Key: user?.avatar!,
  };
  const command = new DeleteObjectCommand(params);
  await s3.send(command);

  await prisma.user.update({
    where: {
      id: user_id,
    },
    data: {
      avatar: null,
    },
  });

  return res.sendStatus(204);
});

app.listen(8080, () => console.log("Server running on port 8080"));
I want to comment some details that I did in the image above. First is dotenv, we gonna set some environment variables to S3, so we need to import dotenv and call the config method, and second multerConfig is exported from the the second file that I gonna comment about in the next section.
Multer
The first thing to do is to setup multer. Multer is a third part middleware that can handle multipart/form-data. The client can send a request with a multipart/form-data content-type and you can access the content and all its information in a object (file/files) attached to the request.
import multer from "multer";
import path from "node:path";
import crypto from "node:crypto";

const tmpFolder = path.join(__dirname, "..", "tmp");
console.log(tmpFolder);

export const multerConfig = {
  tmpFolder,
  storage: multer.diskStorage({
    destination: `${tmpFolder}`,
    filename: (req, file, callback) => {
      const fileHash = crypto.randomBytes(16).toString("hex");
      const fileName = `${fileHash}-${file.originalname}`;

      return callback(null, fileName);
    }
  })
};
This is a very basic configuration. First you need to create a tmp/ folder in the root directory and create a variable that receives the full path to tmp/ using path.join(). The destination property is where multer is going to save the file temporarily, and the filename receives a function that has three parameters, the request, the file object and a callback function. In this case I hashed the filename to make sure the name is unique, and the function return the callback function with two arguments, the first is an error that in this case is we pass as null and the second is the filename.
- You could create your own strategy to create a filename
Prisma
Prisma is a ORM (Object Relation Mapping) that helps with the database connection and queries. The Prisma setup is one of the most easiest to do. You can just follow their getting-started. First initialize Prisma:
user@linuxcomputer ~ $ npx prisma init --datasource-provider sqlite
Now you can create the model that is basically a table in the database. You can do that in the prisma/schema.prisma.
generator client {
  provider = "prisma-client-js"
}

datasource db {
  provider = "sqlite"
  url      = env("DATABASE_URL")
}

model User {
  id     String  @id()
  name   String
  avatar String?

  @@map("users")
}
*in the future I'll write a post with more details about Prisma and TypeORM
To finish Prisma setup notice that we instanciated Prisma with the code bellow.
const prisma = new PrismaClient();
S3
S3 is a cloud service offered by AWS that allowed you to save "objects" in the cloud. I gonna give a brief explanation on how to create a bucket in S3. First login on an AWS account and go to dashboard and click in S3.
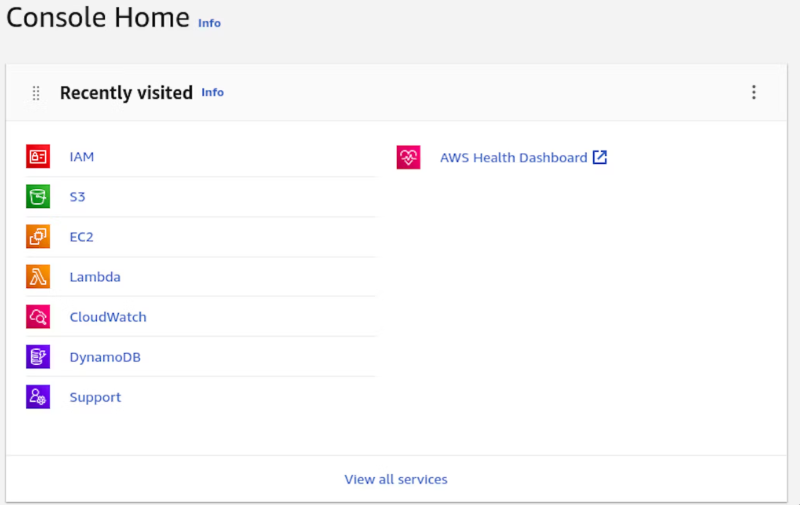
Now click on the big orange button...

Give a unique name and choose a region near to you and click "create a bucket" on the bottom of the page
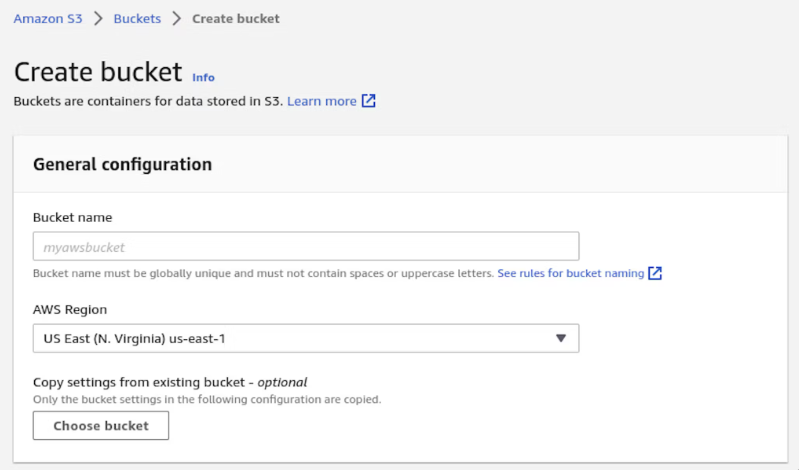
Now in your ".env" add variable with the name and the region that you chose
BUCKET_NAME=
BUCKET_REGION="eu-west-3"
Now go back to the home page and click on the IAM and select "policies" option and then go to "Create a Policy".
Set the service to S3 and the actions are:
- Read -> GetObject;
- write -> PutObject, DeleteObject.
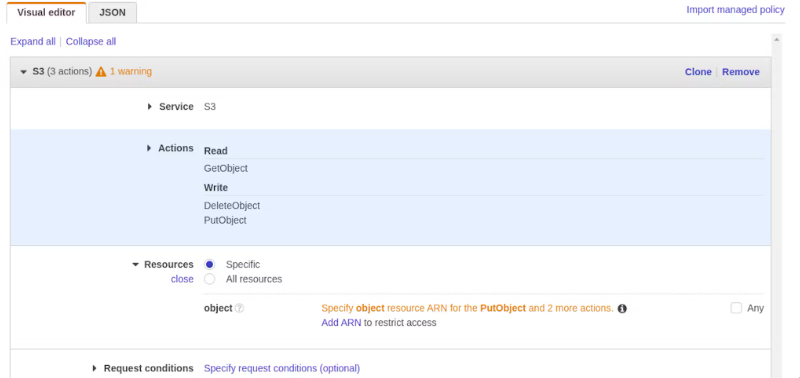
Now for Amazon Resource Names (ARNs) uniquely identify AWS resources you just need to put the bucket name and select any for object name and click "add"
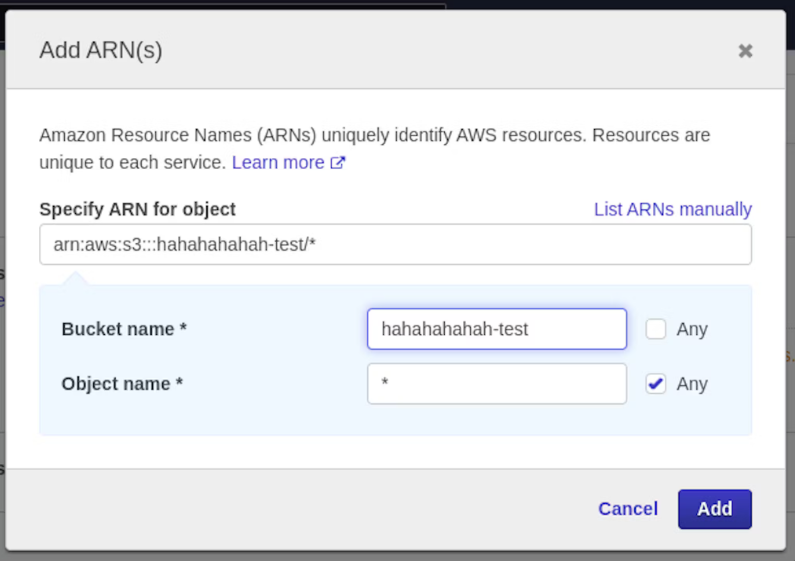
Now just click next and next again. In the last step just give the Policy a name like "haha-test-access" and click "create policy". Now you need to create a user to access the bucket. Go back to IAM and click on "Users" and then "Add user" and the first step give the user a name like "haha-test-s3".
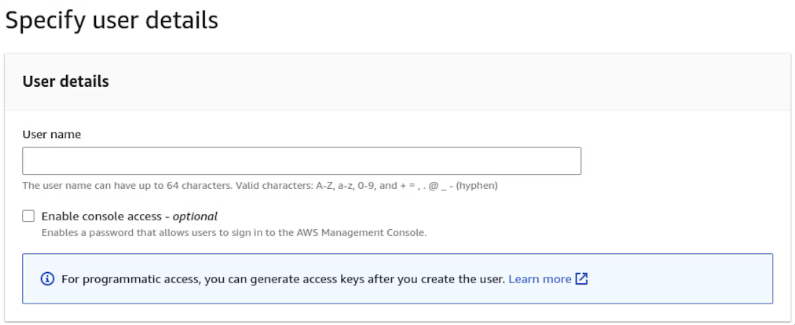
In the next step you're going to set permissions. Select "Attach policies directly" and find the policy that you create.
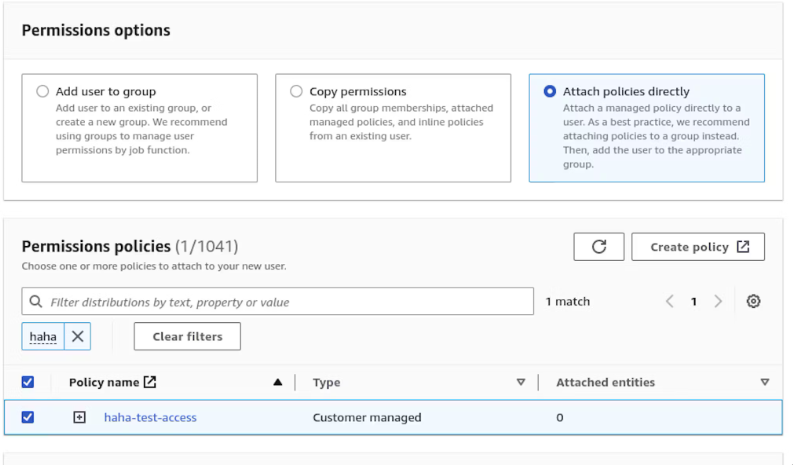
After that on the bottom of the page click "create user".
Access the user and you'll see the following page, now click on "security credentials".
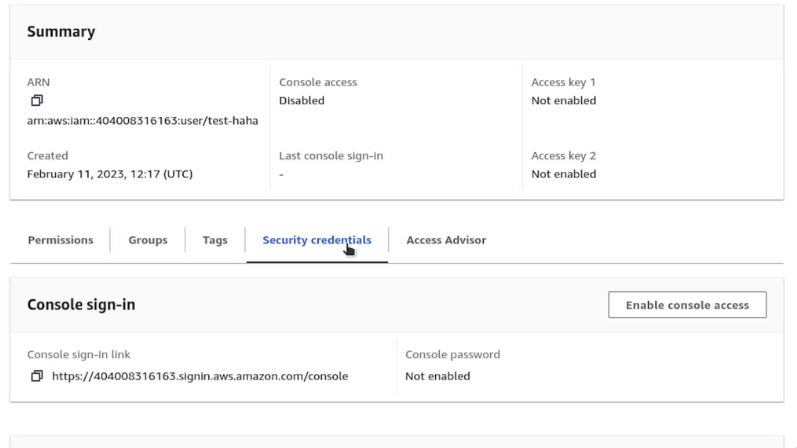
Scroll down the page till you find "Access keys" . Just click "create access key" , select the option as I did in the next image and click "next".
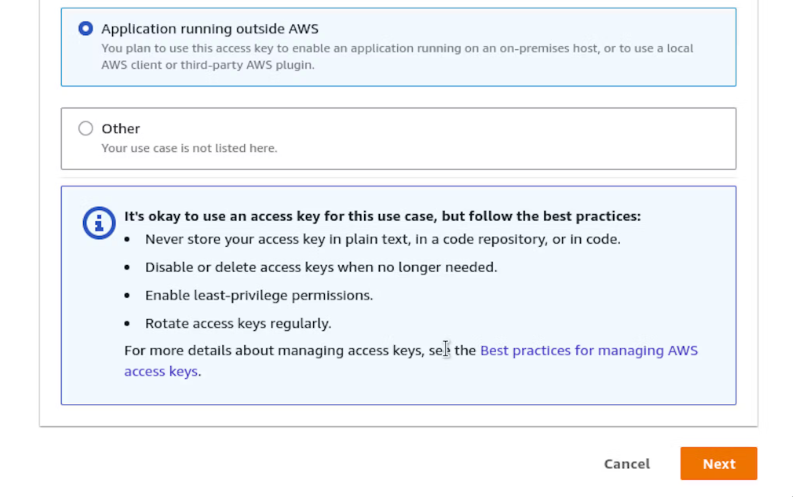
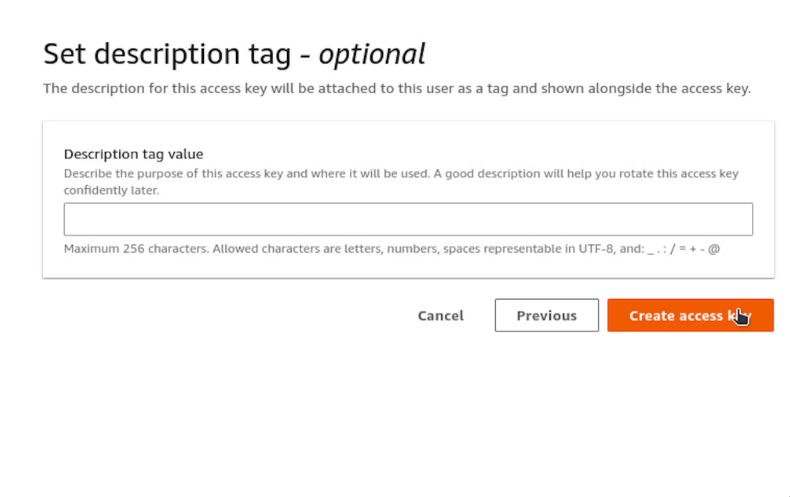
In the next step click as I did in the image bellow
The last step is to retrieve the access keys and put in your .env
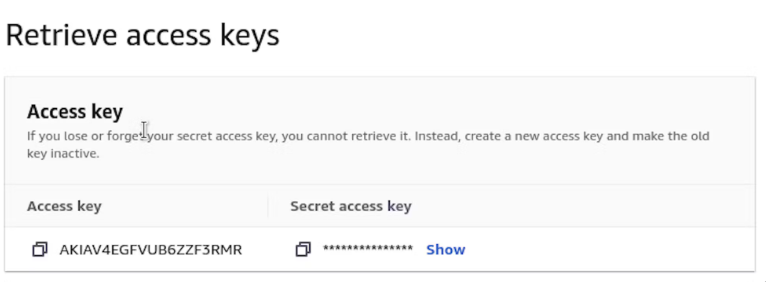
ACCESS_KEY=
SECRET_ACCESS_KEY=
That's it for S3, now let's get back to the code.
First lets retrieve the environment variables and instanciated the S3 client.
const bucketRegion = process.env.BUCKET_REGION;
const bucketName = process.env.BUCKET_NAME;
const accessKey = process.env.ACCESS_KEY;
const secretAccessKey = process.env.SECRET_ACCESS_KEY;

const s3 = new S3Client({
  credentials: {
    accessKeyId: accessKey!,
    secretAccessKey: secretAccessKey!,
  },
  region: bucketRegion,
});
Routing
Let's create the endpoints and their logic.
First of all, setup the express server.
const app = express();
app.use(express.json());
app.use("/", express.static("./tmp/"));

const avatarUpload = multer(multerConfig);

app.listen(8080, () => console.log("server running on port 8080"));
and you can create all the routes before the app.listen().
The first route it's going to be the one that creates an user.
- I'm not going to do any validation on this demonstration, I want to keep as simple as possible.
app.post("/user", async (req: Request, res: Response) => {
  const { name } = req.body;

  const id = uuid();
  const newUser = await prisma.user.create({
    data: {
      id,
      name,
    },
  });

  return res.status(201).json(newUser);
});
Now to fetch the user
app.get("/user", async (req: Request, res: Response) => {
  const users = await prisma.user.findMany();
  res.json(users);
});
To upload the image to S3 and save the filename for reference copy the code bellow.
/*
 * Needs to save the imageName with a userId in the database
 */
app.post(
  "/user/avatar/upload",
  avatarUpload.single("avatar"),
  async (req: Request, res: Response) => {
    const { user_id } = req.headers;
    const file = req.file;

    const user = await prisma.user.findUnique({
      where: {
        id: user_id as string,
      },
    });

    if (!user) {
      throw Error("User not found!");
    }

    if (!user.avatar) {
      const dirName = path.resolve(multerConfig.tmpFolder, file?.filename!);
      const fileContent = await fs.readFile(dirName);
      console.log(fileContent);

      const putParams: PutObjectCommandInput = {
        Bucket: bucketName,
        Key: file?.filename,
        Body: fileContent,
        ContentType: file?.mimetype,
      };
      const putCommand = new PutObjectCommand(putParams);
      s3.send(putCommand);

      const getParams: GetObjectCommandInput = {
        Bucket: bucketName,
        Key: file?.filename,
      };
      const getCommand = new GetObjectCommand(getParams);

      const url = await getSignedUrl(s3, getCommand, { expiresIn: 3600 * 24 });

      await prisma.user.update({
        where: {
          id: user.id,
        },
        data: {
          avatar: file?.filename!,
        },
      });

      await fs.unlink(dirName);

      return res.json({
        url,
      });
    }
    return res.status(400).json({ message: "user already has an avatar" });
  }
);
First thing to notice is the middleware added in the app.post("/user/avatar/upload", avatarUpload.single("avatar")) will treat the multipart/form-data and save the avatar picture in the tmp/ with the hashed name. After that, the next function is called and we can do all the logic to save the picture in the S3 bucket, save the filename in the database and delete it from the tmp/. One thing to mention is that the putParams.Body only receives a buffer data, I used the path.resolve to get the file path and the the fsPromise.readFile to return data as a buffer object. Now just create a putParams and create a command with the PutObjectCommand and then call the send method with the command using the S3 instance. To delete the file from the tmp/ folder just call the unlink method from fsPromise passing the file path. And I think the logic to update the user avatar filename in the database is pretty simple.
Get the signed URL from the user avatar
/*
 * GET request needs a database to access the imageName
 * saved in the POST request.
 */
app.get("/user/avatar", async (req: Request, res: Response) => {
  const { user_id } = req.body;

  const user = await prisma.user.findUnique({
    where: {
      id: user_id,
    },
  });

  const params: GetObjectCommandInput = {
    Bucket: bucketName,
    Key: user?.avatar!,
  };
  const command = new GetObjectCommand(params);
  const url = await getSignedUrl(s3, command, { expiresIn: 3600 * 24 });

  return res.json({ url });
});
You need to receive the user_id from the request body and them find the user now just create a params object with the bucket name and filename from user.avatar. Create the command and call the getSignedUrl() method.
And the last endpoint is to delete the image from the S3 bucket and from the database.
/*
 * DELETE request needs the userId to identify the imageName
 * to delete from S3
 * Uses the DeleteObjectCommand from "@aws-sdk/client-s3"
 */
app.delete("/user/avatar/delete", async (req: Request, res: Response) => {
  const { user_id } = req.body;

  const user = await prisma.user.findUnique({
    where: {
      id: user_id,
    },
  });

  const params: DeleteObjectCommandInput = {
    Bucket: bucketName,
    Key: user?.avatar!,
  };
  const command = new DeleteObjectCommand(params);
  await s3.send(command);

  await prisma.user.update({
    where: {
      id: user_id,
    },
    data: {
      avatar: null,
    },
  });

  return res.sendStatus(204);
});
There isn't nothing to comment about, is pretty similar to the get URL. Now you can use insomnia or postman to test the application.
For more details you can check all the source code in my Github (link to the repo).
Keep striving for progress, not perfection. And always remember a little progress everyday goes a long way!